Showing posts with label polymer clay. Show all posts

Saturday, October 9, 2010

Polymer Clay: orange kitty

Christi Friesen styled kitty cat.  These are faster and easier to make than the lions.
As usual with Christi's designs right on the first shot.

Patty

Polymer Clay: dragons and bird


These are Christi Friesen style creations. The first is a dragon, the second is a dragon on a pile of gold and the last is a bird.  Really fun projects.  I used the dragon on the gold as a monster in a game of DnD that I ran.


Patty

Polymer Clay: Inked beads, tile hearts

These are translucent beads with two colors of adirondac inks.  They were put in the tumbler and then buffed.  I made these a year or so ago and they looked boring and I did not do anything with them.  But I Finally figured out how to tumble and buff and they look great now.

Patty

Above are curvey beads from a mistake.  I tried making a cane that looks like glass tiles and grout.  but I made it too small and the effect did not work.  I eventually made a large cane and I used it to make hearts.
These are beads using the bad cane from the previous picture.

It just goes to show that even mistakes can be used for other stuff when working in this medium.

Here is the good cane used to make hearts.  The one on the left did not come out good but the one on the right came out good.
The one on the left had the cane put on the round ball before the heart was formed so it stretched significantly.  The one on the right had the cane slices put on the cone shape that leads to the heart shape. No stretching here.

Patty


Polymer Clay: Mayan croc cane

This is an attempt at caning and reducing.  This is a mayan style croc inspired by some pictures I found by googling images of mayan art.  It is not perfect but I still love it and did a good job reducing.  I think I finally have the hang of caning.  I had at some point last year given up on caning images as impossible.  I managed to reduce a cane recently and I got back into it.  My mistake was that I did not stretch enough during the process.

Patty

Polymer Clay: Brown casablanca beads

Here is a casablanca style bead and several swirl beads using different canes and scrap from the casablance bead.  These are inspired from desired creations.  I hand sanded these and buffed them with the buffer.  The complaint I have about these is that they have too much black in them.  It is possible to do this by making the black layer thinner.

Patty

Polymer Clay: Book cover dragon eye

These are the front and back covers for a journal.  On the back cover is a dragon eye inspired from items I have seen on etsy.  The eye ball itself is from a cane I made.  On the front cover is my first wack at putting letters into metal, patina'ed, and polished copper.  The lettering says spell book.
The are swarovski crystals in the corners. I tried a cheapo glue on crystal but it was plastic and it melted when I tested it in the toaster oven.
The dragon scales are slices of cane.

Patty

Polymer Clay: malachite faux

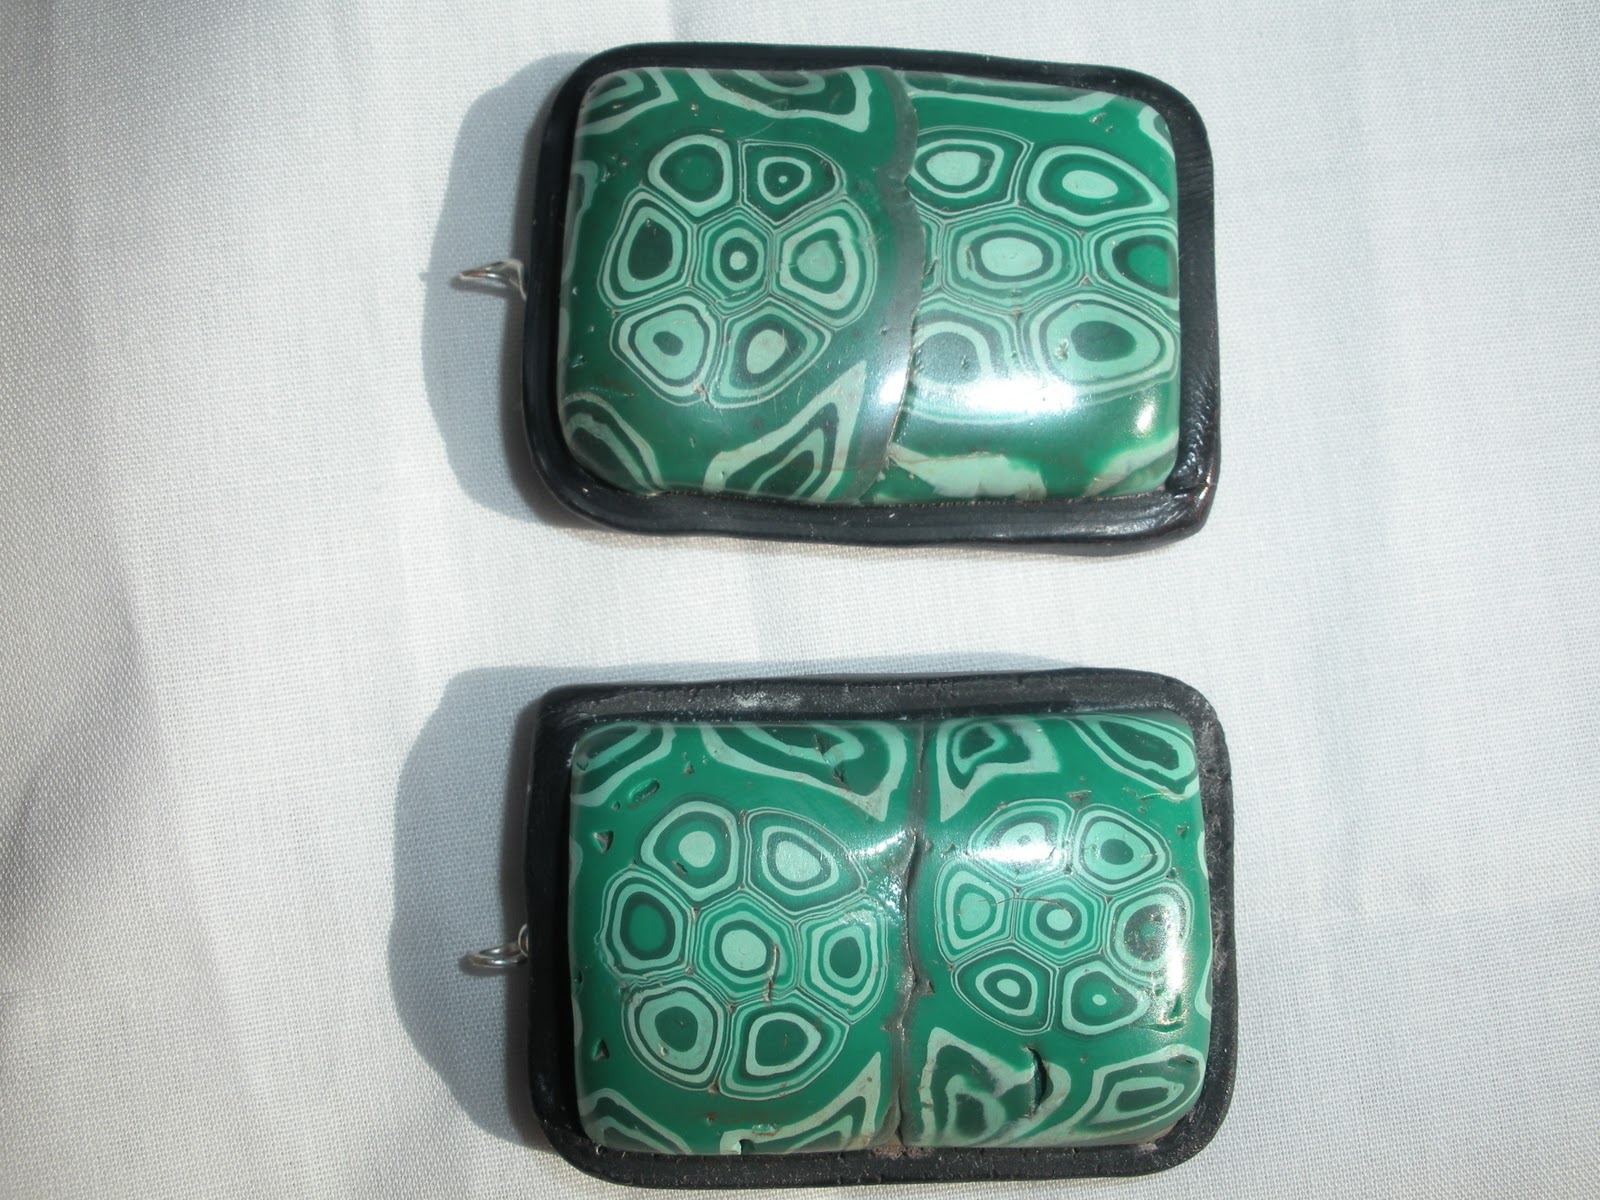
first cut at a malachite from Making Polymer Clay Beads by Carol Blackburn.  Mine looks more like a flower than a random stone.  But it is fairly pretty.  When I cut the rectangles I put saran wrap on top then pushed down making nice curved sides.  I put a layer of black on the back and black strips along the sides.  I am trying to get better at finishing.
I put them in the tumbler with soap water and river rocks (1/2 inch size or less) then polished them with the buffer.

Patty;)

Wednesday, April 21, 2010

Polymer Clay: Lion

Christi Friesen style lion.
From the Cats book.
Next up I want to make dragons.  They might be useful for DnD if I make them on scaled miniature bases.

Keep an open mind
p

Polymer Clay: Bird

Christi Friesen style bird of paradise.  This is from the Mixed Media book she wrote.  She did a great job texturing the feathers.  Mine are passable but not as good.  Had some problems with the tail feathers.  I flattened them too much.  To fix it I put more rounded feathers on top and covered up the mistake.  At first I used too much clay for the body and had to remake it.  I also did not get a feel for how thick the body should be to get the wings to lay on each other. I also did not get a hang of making feathers.  With some problems it came out nice in the end.  Her instructions are very good and my problems come from me not her.

Keep trying, clay can always be mushed up and done over.
p

Friday, April 16, 2010

Polymer Clay: Buttons


I made buttons to match a piece of fabric for my friend.  I mixed all of the colors and marbled the clay.  She wanted basic round buttons.  Nothing funky.. I have seen some cool buttons at bas relief on etsy.  Oh well.  She reports that she likes them and will make an outfit with them.  Hopefully I will get a picture that I can share here.
p

Polymer Clay: Savannah


The lion is Christi Friesen style.  My mom gave me some polished stones from my grandfather's collection.  (This might even be pertified wood.)  She asked me to team it up with the lions in a creation.  This is what I came up with.  I used my extruder to make the grass.  I think she is getting this for mother's day.

p;)

Sunday, January 31, 2010

Polymer Clay: Steampunk Critters

I finished the blue afghan today and it is now in use on my bed.

Here are two projects I finished today.  Steampunk elephant and dragonfly.  These projects came out of the new Christi Friesen book Steampunkery.
I bought a bag of watch parts,  searched the house high and low, and tore apart a watch I found to add parts to these two critters.
These projects were fun to make but the elephant had its difficulties.  I did not get the trunk, ears and eyes placement right.  But it looks ok.  I will have to try again.

keep claying
pv

Friday, January 1, 2010

Polymer Clay: Acrylic Ink sheet

Using acrylic inks I made a multi colored sheet with a sponge.  I circle cut using different sizes so I could get a center circle to bead.  The layers are very easy to see.  Maybe I should paint the sides black.
I used yellow, orange and chestnut colored ink.

patty

Polymer Clay: Inked Sheet pendant


Using the same inked sheet I made this pendant.  It was sanded and buffed.

Keep experimenting
patty

Polymer Clay: Ripped open


This pendant starts with a silver textured layer, then a decorated sheet.  The center is punched out so that bead strings can go through as a lariat type of necklace.  I saw this type of necklace on another blog.  She did a much better job at ripping out the center.  The silver textured sheet was acrylic black painted and wiped.  This could use some steampunking!

Don't forget how to play
patty

Polymer Clay: Ripped Layers


I saw a pendant on the internet somewhere with ripped layers.  So I took some sheets and tried it. First layer is inked, second layer is gold wood grain, third layer is rainbow striped, and fourth layer is the gold wood grain again.  I made a clay tube for the back.  I did not do a great job putting it together but it came out ok.

Keep experimenting
patty

Polymer Clay: Inked Translucent Pendant


This pendant is three layers of clay.  First layer is a gold and ecru striped sheet wood grain technique.  Second layer is black and third layer is ecru base with translucent alcohol inked on top.  The inked layer is thinned in the pasta machine to help thin the translucent.  There is a jump ring clayed to the back.  The inked layer is based on techniques from The Polymer Clay Art book.

Have fun
patty

Tuesday, December 29, 2009

Polymer Clay: chaos blue


I was trying to make a surface made of strips of sheets I have previously made.  It came out terrible so I scrapped it.  In the mean time I made scrap clay and I made a block and ripple cut it.  I came out with a nice blend and made the slices into pendants.  So for a complete accident this is the result. 

Make mistakes they can be cool
patty

Sunday, December 27, 2009

Polymer Clay: Heart two


Well I experimented today to fix the one with too much sanding/polishing and it came out terrible so I trashed it.  This red one came out really well.  I froze the cane and was able to slice thinner and get an overall translucency effect.  The hearts are large pieces, so I will have to find large beads to go with them.  I wish I could finish a necklace right away but just don't have the supplies.  Love this project, and I have a ton of cane left to play with.

Keep experimenting
patty

Saturday, December 26, 2009

Polymer Clay: Hearts


I received a large stash of books this Christmas.  And one of them was Polymer Clay Art.  I saw this project and had to try it right away.  This is a cane method of covering a base bead.  The cane uses translucent clay so the base shows through.  My results were not as good as the book because I am not good at thin slicing.  But I am still pleased with how mine came out.
I had a few problems: 1. browning of the clay, did I bake it too long? Temp was ok.  2. Sanded the layer right off and the base color popped out.  Watch what your doing while sanding.  3. There is jeweler's rouge on the buffing wheel and it discolored the clay.  I scraped it off and repolished by hand.  The buffing wheel I have is old, from my grandfather, so the wheel is old and used.  Buy a new wheel.
Also Christi Friesen has a new steampunk book out, I must have it.

Keep experimenting

patty